OpenSSL - Self Signed Certificate
Updated on 23 Sep 2020
This tutorial will show you the steps needed to create a self signed SAN (Subject Alternative Name) certificate.
Also worth noting modern browsers aren’t trusting:
- certificates without the SAN specification (so the extra steps needed for SAN are required)
- self signed certificates. They need to be signed by a CA, and I cover that in a later tutorial
Copy the openssl.cnf file to a local directory
Unless you’re comfortable making changes to the original configuration file, we’ll copy it to a local directory.
cp /usr/lib/ssl/openssl.cnf localhost.cnf
Add the v3_req settings
Under the [ v3_req ] section, set the following along with any alternative names for this certificate. In my example I’ll use localhost and yii.
[ v3_req ]
basicConstraints = CA:FALSE
keyUsage = nonRepudiation, digitalSignature, keyEncipherment
subjectAltName = @alt_names

[ alt_names ]
DNS.1 = localhost
DNS.2 = yii
We also need to uncomment the following line under the [ req ] section so that certificate requests are created with v3 extensions (line 114 and line 129 - there are comments in the file telling you what they are for).
x509_extensions = v3_ca # The extensions to add to the self signed cert
req_extensions = v3_req # The extensions to add to a certificate request
Create self signed certifcate
For now we’ll just create the keys in the local directory.
openssl req -x509 -nodes -days 365 -extensions v3_req -newkey rsa:2048 -keyout apache-selfsigned.key -out apache-selfsigned.crt -config localhost.cnf
An explanation on some of the settings we have used are on this website. Basically all the flags are related to the req command.
reqthe command to create and process certificate requests in PKCS#10 format. link-x509this means we are using the X.509 is public key infrastructure standard used by SSL/TLS for key and certificate management. We are using it for CSR (certificate signing request) management. Link-nodesThis tells OpenSSL to skip the option to secure our certificate with a password. (this is mainly for Apache so we don’t have to enter the password each time we restart Apache).-dayshow long the certificate will be valid for. If not set, defaults to 30 days.-extensionswhat extensions we wish to load.-newkeyThis specifies that we want to generate a new certificate and a new key at the same time. We did not create the key that is required to sign the certificate in a previous step, so we need to create it along with the certificate.-keyoutoutput filename for the key.-outoutput filename for the certificate.-config localhost.cnfrefers to the file we created in step 1 that we will use for the config.

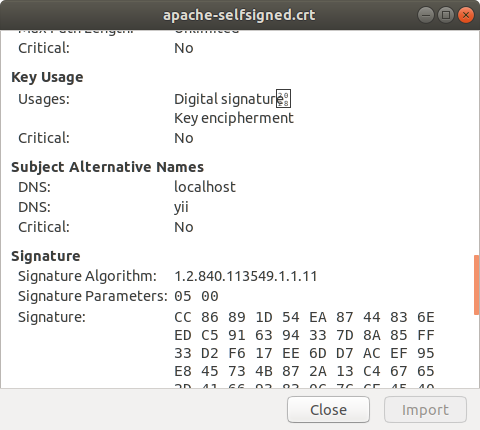
Examine your certificate
In the directory that the certificate was created, you can double click on the apache-selfsigned.crt file, and the information about your certificate will be shown. Click on the details tab and scroll down until you see the Subject Alternative Names field. localhost and yii should be there - the names we added into the config file in step 1.